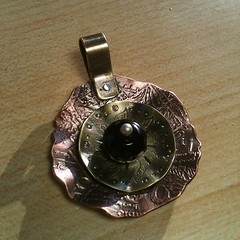
Showing posts with label "Volcano Arts". Show all posts

Wednesday, March 7, 2012

Cold Connections

No, I'm not talking about dating in the Far North.  I'm talking about using rivets to connect metals.  It was one of the primary things I learned during my last class at Volcano Arts (almost a year ago now!)

When I returned from that class, I did a series of blog posts here, here, here and here.  And I also created some pieces last summer using the skills I learned and posted them here.  Now that my General Earring Inventory is close to where I like it to be (~200 pairs ready for either wholesale or consignment), I decided to tackle some new projects using rivets. 

The first few things I made turned out ok, but not awesome.  I think I was trying too hard to come up with interesting designs and not planning enough.  One of the most important things I learned in that class was to plan your piece from start to finish.  Otherwise, you can get yourself stuck in a corner, with no way out.  Not good.

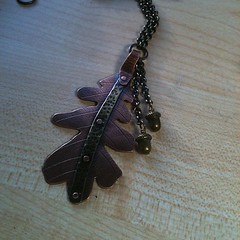
This oak leaf pendant is well executed, but it doesn't excite me.  It's too flat ... or something! 

My dissatisfaction with this helped me make the decision to go back to a familiar design that DOES excite me.  Basically, I'm moving forward with "variations on a theme", an approach that has served me well with almost all of my jewelry making for the past 16 years.  With each piece I make, I learn something new and my technique improves.  Yes, the pieces are similar, but there's nothing wrong with that.  It lets me hone my skills, without the added pressure of coming up with new designs.
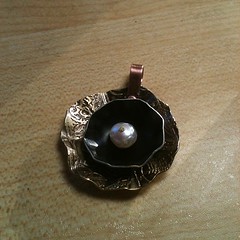
Better, right?


Even better yet!
(well, except for the stupid ding just to the left of the top rivet... grrr)


I'll be at it for the next few days, making more of these 3 dimensional pendants with copper, brass, pearls, gemstones and who knows what else!

Friday, June 24, 2011

New Metal Projects

Remember this post?  It features a pendant I made while in class at Volcano Arts back in April.  Now that I have my new miniature jeweler's bench and a small drill press, I decided there were no more excuses -- I had to start actually making some things.

Starting with the same design featured in that blog post, I made 2 more pendants.  For this first one, I etched a piece of brass and free-cut a circle-ish shape.  Because most of the brass is hidden, you can't see the gorgeous leaf pattern that I etched.  The black layer is a ready-made circle of anodized aluminum I found in my stash.  The center piece is sterling silver that I stamped with the letter "S" around the edges.  The 3 layers are held together with a rivet I made from 14 ga copper wire.  The bail is also copper, with a sterling rivet to attach it to the pendant.


The bottom layer of the next pendant  is a piece of copper from a sheet that I patinated (about 4 years ago -- I still have plenty of it left!) with an ammonia and salt concoction that I learned from Linda & Opie O'Brien's book Metal Discovery Workshop.  The middle layer is another piece of anodized aluminum that matches the aqua patina below it very nicely.  The center is a copper circle that I stamped.  The rivets and the bail are also copper.


This last piece is one I started while still in class 2 months ago.  All of the complex sawing was done in class, without a plan for how I would finish it.  This is sort of a no-no, as I've been taught to have a plan (thanks Christine!).  Having a plan ensures that all of the steps are completed in the proper order.  I can't tell you how important this is in a metalsmithing project.  Because of my lack of planning, I ended up with plenty of scratches that could have been avoided, and stupid time-wasting work-arounds.


Taking that into consideration, I think the piece turned out great!  I'm especially proud of the back, where I can show off my improved riveting skills:


I am so pleased with all of my pieces ~~ *pats self on back*

Thursday, April 28, 2011

Volcano Arts Wrap-Up

I hope you enjoyed my posts about the items I created during my class at Volcano Arts.  Thanks for all of your comments.  I'm anxious to get started using the skills I learned there, but there's a big hurdle.  I don't yet have all of the tools I need, nor do I have a suitable space.  Rick has some things he's supposedly gathering for me.  The rest, I need to order from Rio Grande.

One of the main things I need is a bench of some sort.  My current workspace is a desk and that will not do at all.  Christine has several benches set up around her classroom/studio to accommodate a bunch of students. This is the table-top bench that I was assigned to.  Christine had it "loaded" with all of the basic tools one needs to work with metal.  More specific and single-purpose tools were available to us as well.  All in all, her studio is a dream.


This bench is available for purchase through Rio Grande.  I plan to buy one from them and I'm trying to figure out what surface I can actually set this on!  My studio needs a serious makeover.

Tuesday, April 26, 2011

Volcano Arts Part III -- A Ring

I had never made a ring prior to this project -- not even a wire-wrapped ring.  Sure, I've purchased plenty of lovely rings, but now it was time to make one.

Disclaimer:  this project was truly a joint effort between myself and Christine, the owner and instructor at Volcano Arts.  I screwed up enough aspects of this ring that I required her assistance more often than not.

Starting with 18 ga brass sheet, using the rolling mill, we rolled a texture onto both surfaces.  Then we cut the sheet to the desired width (about 5 mm).  I then filed all the edges and rounded the short edge that would be exposed on top.  A photo would be helpful at this point.


Working with a ring mandrel and rawhide hammer we  Christine finally made the ring round.  This took a verrrry long time.  Drilling holes for the rivets came next.  Making, inserting and setting the copper rivets was the last step.  This brief description makes this ring sound simple, but trust me, it was anything but.

The problems included a broken drill bit in one of the holes, unmatched rivets, a rougher-than-I'd-like interior where the rivets are.  Other than that, I LOVE this ring!


Will I make another?  Probably ... someday.

Monday, April 25, 2011

Volcano Arts Part II

As promised, here's a look at the second piece of jewelry I created during my class at Volcano Arts.


Some of the details --

The bottom circle was sawed --freeform again! -- because I wanted the edge ruffled instead of being perfectly smooth.  I sawed it out of the same piece of etched brass as the dome on my first pendant.

The middle circle was made using a disc cutter.  Using a riveting hammer, I made a starburst pattern, then domed it in a dapping block.  Finally, I ruffled the edges with pliers.  It is nickel silver, an alloy of copper, zinc and nickel.

Christine, my instructor and the owner of Volcano Arts, created the center piece by melting copper scraps, which turned into a ball. I forged it flat-ish, letting it retain its rustic look.


The rivet holding all 3 pieces together is one I created from 14 ga sterling silver wire.  I cut the bail from copper sheet and it is connected to the pendant with another handmade sterling silver rivet.

A peek at the back of the pendant, where you can see that I did a much better job of setting the rivet.


The last thing I did was patinate, with a quick dip in liver of sulfur, followed by a very light polishing with 800 grit polishing paper.

My last project was a ring and I'll share that with you soon!


Sunday, April 24, 2011

Volcano Arts Part I

I am home from my week long class at Volcano Arts.   My creative juices are flowing and my mind is trying desperately to keep up!  I had a fabulous time learning some basic metalsmithing with cold connections.

I managed to complete 3 pieces of jewelry and came home with another one partially done.  I'm planning a series of blog posts (3 or 4) to cover all that I want to share with you about my week -- I hope I keep it interesting enough that you'll stick with me throughout.

There was only one other student in the class, so we each had a lot of one-on-one time with Christine, our instructor.  This really worked to my advantage, as well as the fact that I had some very specific ideas as to what I wanted to make.  I had even done some sketches -- I rarely do that, but I think that might change now.

The processes involved in my first project included etching, sawing, filing, riveting and patinating.  I had big plans to photograph each step, but I completely forgot about that, so all I have are photos of the finished product.


This angled photo shows you the dimension I was able to achieve with the design.  I sawed the circle, including the bail, using a jeweler's saw.  This gave me an immense amount of confidence in my sawing abilities and it was a great way to start the week.  The domed piece in the center is a piece of brass that I etched using a gorgeous rubber stamp.  It is actually a large rubber stamp -- this small piece was stamped out using a circle cutter.  You'll see where I use more of that etched image in my next project - stay tuned!

Here's a view of the back, showing you some complex sawing for a beginner like me.  The base piece is copper that I patinated.  The rivet is one I made from brass wire.  Yes, the back of the bail is quite scratched.  I learned that it's easier (and a whole lot smarter) to avoid making scratches in the first place, than it is to remove them later. 


One more photo of the completed piece.  Not bad for a freehand sawed circle, huh?


Wednesday, April 30, 2008

Metalsmithing & Bookbinding

I recently attended a fabulous class at Volcano Arts in Volcano, California. The focus of the class was bookbinding and I decided to pursue the option of making a metal cover for my book. With the exception of the eyelets, I fabricated every piece of metal in this book!

The main part of the cover is patinated copper. The wavy brass strip is repeated on the back cover. The closure panel is also brass to which I have riveted an etched piece of nickel silver. The book closes with a length of black elastic which lies under the curve of the nickel silver.

I learned the coptic binding technique to complete this book. This was an amazing class taught by Christine Cox, owner of Volcano Arts. She is a wealth of knowledge and a generous teacher.