Thursday, April 28, 2011

Volcano Arts Wrap-Up

I hope you enjoyed my posts about the items I created during my class at Volcano Arts.  Thanks for all of your comments.  I'm anxious to get started using the skills I learned there, but there's a big hurdle.  I don't yet have all of the tools I need, nor do I have a suitable space.  Rick has some things he's supposedly gathering for me.  The rest, I need to order from Rio Grande.

One of the main things I need is a bench of some sort.  My current workspace is a desk and that will not do at all.  Christine has several benches set up around her classroom/studio to accommodate a bunch of students. This is the table-top bench that I was assigned to.  Christine had it "loaded" with all of the basic tools one needs to work with metal.  More specific and single-purpose tools were available to us as well.  All in all, her studio is a dream.


This bench is available for purchase through Rio Grande.  I plan to buy one from them and I'm trying to figure out what surface I can actually set this on!  My studio needs a serious makeover.

Tuesday, April 26, 2011

Volcano Arts Part III -- A Ring

I had never made a ring prior to this project -- not even a wire-wrapped ring.  Sure, I've purchased plenty of lovely rings, but now it was time to make one.

Disclaimer:  this project was truly a joint effort between myself and Christine, the owner and instructor at Volcano Arts.  I screwed up enough aspects of this ring that I required her assistance more often than not.

Starting with 18 ga brass sheet, using the rolling mill, we rolled a texture onto both surfaces.  Then we cut the sheet to the desired width (about 5 mm).  I then filed all the edges and rounded the short edge that would be exposed on top.  A photo would be helpful at this point.


Working with a ring mandrel and rawhide hammer we  Christine finally made the ring round.  This took a verrrry long time.  Drilling holes for the rivets came next.  Making, inserting and setting the copper rivets was the last step.  This brief description makes this ring sound simple, but trust me, it was anything but.

The problems included a broken drill bit in one of the holes, unmatched rivets, a rougher-than-I'd-like interior where the rivets are.  Other than that, I LOVE this ring!


Will I make another?  Probably ... someday.

Monday, April 25, 2011

Volcano Arts Part II

As promised, here's a look at the second piece of jewelry I created during my class at Volcano Arts.


Some of the details --

The bottom circle was sawed --freeform again! -- because I wanted the edge ruffled instead of being perfectly smooth.  I sawed it out of the same piece of etched brass as the dome on my first pendant.

The middle circle was made using a disc cutter.  Using a riveting hammer, I made a starburst pattern, then domed it in a dapping block.  Finally, I ruffled the edges with pliers.  It is nickel silver, an alloy of copper, zinc and nickel.

Christine, my instructor and the owner of Volcano Arts, created the center piece by melting copper scraps, which turned into a ball. I forged it flat-ish, letting it retain its rustic look.


The rivet holding all 3 pieces together is one I created from 14 ga sterling silver wire.  I cut the bail from copper sheet and it is connected to the pendant with another handmade sterling silver rivet.

A peek at the back of the pendant, where you can see that I did a much better job of setting the rivet.


The last thing I did was patinate, with a quick dip in liver of sulfur, followed by a very light polishing with 800 grit polishing paper.

My last project was a ring and I'll share that with you soon!


Sunday, April 24, 2011

Volcano Arts Part I

I am home from my week long class at Volcano Arts.   My creative juices are flowing and my mind is trying desperately to keep up!  I had a fabulous time learning some basic metalsmithing with cold connections.

I managed to complete 3 pieces of jewelry and came home with another one partially done.  I'm planning a series of blog posts (3 or 4) to cover all that I want to share with you about my week -- I hope I keep it interesting enough that you'll stick with me throughout.

There was only one other student in the class, so we each had a lot of one-on-one time with Christine, our instructor.  This really worked to my advantage, as well as the fact that I had some very specific ideas as to what I wanted to make.  I had even done some sketches -- I rarely do that, but I think that might change now.

The processes involved in my first project included etching, sawing, filing, riveting and patinating.  I had big plans to photograph each step, but I completely forgot about that, so all I have are photos of the finished product.


This angled photo shows you the dimension I was able to achieve with the design.  I sawed the circle, including the bail, using a jeweler's saw.  This gave me an immense amount of confidence in my sawing abilities and it was a great way to start the week.  The domed piece in the center is a piece of brass that I etched using a gorgeous rubber stamp.  It is actually a large rubber stamp -- this small piece was stamped out using a circle cutter.  You'll see where I use more of that etched image in my next project - stay tuned!

Here's a view of the back, showing you some complex sawing for a beginner like me.  The base piece is copper that I patinated.  The rivet is one I made from brass wire.  Yes, the back of the bail is quite scratched.  I learned that it's easier (and a whole lot smarter) to avoid making scratches in the first place, than it is to remove them later. 


One more photo of the completed piece.  Not bad for a freehand sawed circle, huh?


Saturday, April 16, 2011

The Last Big Pile of Snow

There are still small patches of snow all over my neighborhood, but this mountain at the Birchwood Airport is still pretty huge.  We've been taking our walkies to the airport because the inlet is a very ugly combination of melting snow, ice and mud.

My men, at the top of Snow Mountain:


I will be out of town for a week attending a metalsmithing class at Volcano Arts in California.  See you when I return!

Friday, April 15, 2011

What's Old is New Again - Artbeads Bloggers Challenge

This latest Artbeads challenge really spoke to me.  I immediately had an idea which would incorporate a polished shard of fossilized walrus ivory from St. Paul Island, Alaska.  I have quite a collection of this lovely material from a local native man that I met a craft show several years ago.  His relatives on St. Paul live a subsistence lifestyle and make a portion of their income from collecting and polishing this naturally shed ivory.  Vintage glass beads were also on my mind.  I went the the Artbeads website to select some lovely brass items to complement the ivory and glass.

In the vast Findings category at Artbeads,  there is a section called Links, which is where I found and fell in love with antiqued brass diamond deco elements.  Now to find some coordinating brass beads.  There were a couple of lovely choices in the Beads category.

I wrapped the ivory shard with some brass filigree from my stash and suspended it from a brass ring (also from Artbeads Findings category).  I added a rusty antique skeleton key and a few vintage glass beads in pink and green.  Keeping with that color scheme and working in a asymmetrical manner, I continued to add beads and brass elements up both sides of the necklace.  This necklace had to be long to balance the large components that I was using -- it would have looked silly at 18" or even 20".  The final length is about 26".  The measurement from the top of the circle to the bottom of the ivory is another 4 1/2" -- this necklace makes a statement! 


Laying the necklace flat, I was able to capture some of the details a bit better:


A close up of the ivory section of the piece.  Here you can see the beadcaps I found on the Beadcaps page at Artbeads.  They are embracing an olive green vintage glass bead.


A better view of one of the beaded segments and the yummy diamond deco pieces:


And one more shot of the whole piece which really showcases the warmth of the ivory and brass:


It's worth mentioning that shopping for this piece at Artbeads was made quite simple by one's ability to shop by material.  I could go directly to the Base Metal category and find matching components so easily.

Disclosure: Artbeads invited me to join their blogging community. I receive these products free of charge in return for honest reviews. I have not been paid for doing this.

Thursday, April 14, 2011

Jet Sees His First Moose!

The day started normally.  Woke up.  Started the coffee.  Put the leash on Jet for his morning walk.  Step out the door.  We stopped dead in our tracks.  SCREAM!  Well, not a real scream -- more of an internal scream.  Jet started barking -- real barking.  What caused all this hysteria?  A moose in the driveway.  This is pretty damn close -- too close for comfort, so I dragged Jet back in the house.  He would have to 'hold it' until Rick could help.  I've been a bit scared of moose ever since my friend Nancy was trampled by one about 6 years ago.


While Rick took Jet for his morning outing, I bravely went on the deck and snapped some more photos, never getting too far from my front door.


That house is across the street, where Murphy the 125 pound labradoodle lives.  He and Jet love to play together in the snow.  It's really fun to watch them.


I thought she was leaving at this point, but she was just reacting to Jet's barking.


Here, she's heading back to those yummy willow branches she was working on.


No zooming on this photo, just to give you perspective on how close this moose is to our house.

Sunday, April 10, 2011

Not Bad for a Sunday

While we woke up to what looked like a serious blizzard, the sky finally cleared off.  The 1" of snow melted quickly, leaving me very little to complain about!

I was quite productive for a Sunday, even though there were plenty of puppy distractions.  This photo shows 23 pairs of earrings.  I made one more pair after taking the photo because 23 simply did not feel right to me.  Silly, huh?


For the past few day, a pair of Bald Eagles has been hanging around our neighborhood.  I can't get enough of them and I finally remembered to bring my camera on our afternoon walk with Jet.  The eagle mating season is probably in full swing this far north and the pair, who mate for life, are probably building or rebuilding a nest.  I only saw one of them today.


It's amazing how easy they are to spot when there are still no leaves on the trees.  I hope they hang around a while.

Wednesday, April 6, 2011

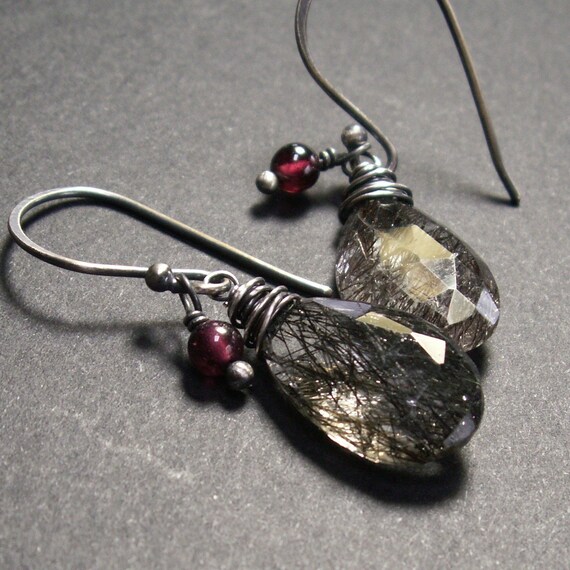
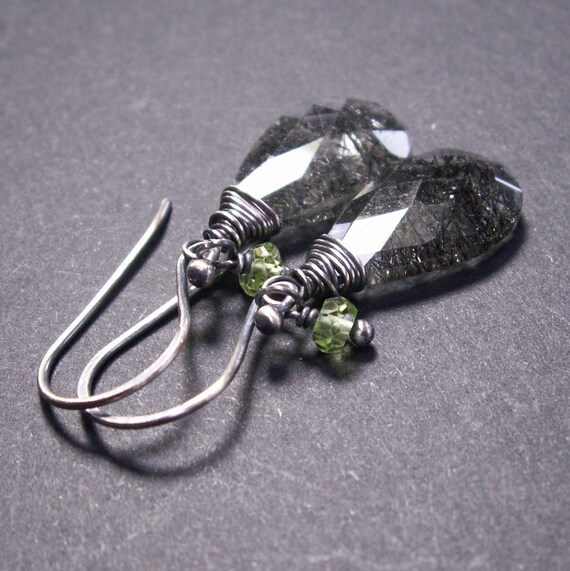
Rutilated Quartz

I've made a couple of new pairs of earrings that are variations on a theme.  I tend to do this variation thing a lot.  I listed two of the pairs yesterday in my etsy shop.

Rutilated Quartz with Garnets:


Rutilated Quartz with Peridot:


I'm sure I will find more rutilated quartz pairs to continue this theme.  Some of the little beads I plan to add are aqua blue cz, citrine, black spinel, crystal quartz, carnelian.  They probably won't all end up in my etsy shop, but will instead be consigned or sold wholesale.  Later in the year, I will make more that will be part of my show inventory.

Tuesday, April 5, 2011

Spring Moose Sighting ...

... in our backyard!

After dinner last night, Rick looked out the window and spotted a big mama moose and what looked like a 2 year old calf with her.  I took these photos out the window, so they aren't very clear.

Here's the baby.  Pretty big, isn't it?


I couldn't get a great shot of the mama, but you can see her head on the right side of the tree.


These are the first moose we've seen around the house in months.  It never ceases to amaze me that these enormous creatures are just wandering around the Anchorage bowl!