Showing posts with label tutorial. Show all posts

Tuesday, May 10, 2011

Jewelry Making Tip :: Front and Back

After stacking beads on a headpin for creating a pair of earrings, we most often make a wrapped loop in order to attach the drops to earwires. I make 2 types of wrapped loops: neat and messy. But that's a topic for another post. This post is about the neat type of wrapped loop. Chances are, you have a favorite method of creating said wrapped loop. Take a close look at the last pair of earrings you made. You will notice that they do not look the same when viewed from the front as they do when viewed from the back.

This first photo shows one drop facing one way and the other drop facing the other way. Can you see the difference in the wrap? This may seem like a minor point, but in a simple pair of earrings, if each one is not suspended from the earwire in the same direction, it can really stick out like a sore thumb.


I won't try to tell you which way is right and which way is wrong, I only suggest that you assemble both earrings the same way. I always hang my drops as seen below, because I see this side of the wrap as "the front". You may see it the other way. Just be consistent!

Thursday, January 28, 2010

Finishing a Necklace with Bead Tips

Finishing a strung necklace can be done in several ways. Most basic stringing classes teach a method involving crimp beads and SoftFlex or Accuflex stringing material. Although I do like those 2 materials, I’ve never liked this method because it leaves some of the stringing material visible in the form of a loop, which is used to attach the necklace to its findings. I developed this alternative method many years ago. Although quite unconventional, I find it to be durable and it provides a more professional looking finish to handcrafted jewelry. It’s all about personal preference.


Using chain nose pliers, make a bend in your string material, leaving about a 1” tail. Insert this bend into a small crimp bead. Crimp, using 2-stage crimping pliers. This will leave the crimp bead round-ish.


String a bead tip so that the crimp is nestled inside the clamshell and both ends of stringing material go through the hole. Close the bead tip gently, but securely with chain nose pliers.


String the first bead, embedding the tail end through it. Trim that tail end close. String the remainder of your beads, ending with another bead tip. Tie an overhand knot and using a heavy needle or an awl, work the knot into the bead tip as far as you can. Tie another overhand knot OVER the first one. This can be tricky and may take some practice. Use the needle – it will help direct the knot where you want it. Insert the tail end of the wire back through the hole in the bead tip and through the last bead strung.


Add a generous dab of glue to the knot. I use Hypo-Cement because it has a narrow applicator which is perfect for inserting into the bead tip. Close this bead tip as you did the other.


Your piece is now ready for the clasp set of your choice.


Wednesday, January 20, 2010

Finishing a Multi Strand Cord Necklace


I make lots and lots of multi-strand necklaces with nylon cord and glass beads. This is one of the products that I wholesale in large quantities, so it was in my best interest to develop a surefire method of finishing these necklaces.

There are several brands of strong nylon cord on the market. My favorite by far is C-Lon, which I purchase from Marion Jewels in Fiber. My local bead store carries it too, but Marion stocks the entire range of colors, which is astounding.

After you've strung your beads, align your cords and tie an overhand knot with all 3 (or however many you have) strands. Tighten this knot.


Tie a second overhand knot directly over the first one. Before tightening this knot, insert a 2 1/2" - 3" length of wire (I use 22 ga sterling silver) through it. Pull this knot tight, incorporating the wire.


Bend the wire around the double knot and make a wrapped loop.


Add a very generous amount of glue (Hypo Cement is my glue of choice) all over and around this knot. Be sure to get some glue on the wire as well. Don't worry about how this looks -- it will all be hidden from view. Trim the excess cord to about 3/8". Don't forget to clean the glue off your trimmers or your scissors!


Before the glue on the cord is completely dry, insert the wire into a cone end. I use 1/2" sterling silver cones. Be sure to get the entire knot and the loose cord ends into the cone. If necessary, push the loose ends in with a toothpick or wooden skewer, or whatever is handy!


Make a wrapped loop at the very top of the cone. Repeat this process on the other end of the necklace.

Add your clasp of choice and your necklace is ready to be worn.


Thursday, November 12, 2009

Fine Silver Headpins

Fine silver headpins can be made quite easily with a small butane torch.

This photo shows my simple set up for making headpins. I use those disposable aluminum cookie sheets for a base and backdrop. I also have a small firebrick that I use mainly when fusing fine silver. It's not really necessary for making headpins. In the foreground is a pair of cross-lock tweezers. Off to the right are 4" lengths of 22 ga fine silver.

Holding a piece of wire with the tweezers, place the bottom end of the wire in the hottest part of the flame. That spot is at the very end of the blue section of the flame. You can see how that cookie sheet comes in handy as a backdrop.

The fine silver will begin to ball up after a few seconds. You will need to slowly lower the wire as this happens. As soon as the ball is the size you want, remove it from the flame and put it on the cookie sheet. It will be hot.

If you leave the wire in the flame too long, the ball will most likely fall off. Then you will be glad you started with 4" of wire, because you still have enough to make another headpin!

The resulting headpins are about 3 1/2" long. If you use 24 ga wire, this will be different. It will take a bit more wire to achieve an adequate size ball.

Here are the completed headpins. This can also be done with sterling silver, but the copper content in sterling silver will cause it to darken (firescale). Also, whenever I've done this with sterling, the balls on the end have been pitted. I suspect that using flux would minimize this problem, but I'm not set up for that in my studio.


Please be sure to read the instructions that come with your butane torch and follow all safety precautions.

Sunday, June 14, 2009

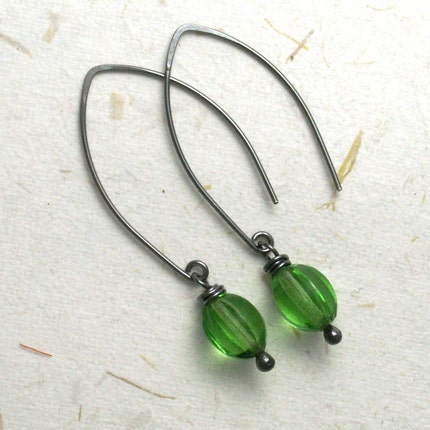
And Another Earwire Tutorial!

Today I'm sharing a new earwire tutorial. I had seen this style earwire in various catalogs, but wanted to try and make my own.

Cut 2 pieces of wire, each about 3" long. I like to use 20 ga half hard for all of my earwires. Make sure your ends are flush cut.

Let's start with a very basic tip. Use a fine point Sharpie to mark a spot on your round nose pliers. This will guarantee that you make the same size loop every time. Make a mark about halfway up. You may have to experiment with the placement of this mark on your pliers, as each brand will be a little different.

Place the wire on the Sharpie mark and make a small loop. This is where the "dangle" will be added when you're done. Repeat with second piece of wire.

Find an item that you can wrap this wire around. I've been using a small glass canister that measures 1 1/8" in diameter. Be creative and look in the kitchen too. Some utensil handles might be just the right size. Gently bend the wire around the cylinder with your fingers. It will spring back slightly, especially if you're using half hard wire, like I do.

Draw a "template" on a piece of paper in this exact shape. In this next photo, you can see that I have 2 different templates on one piece of cardstock. I sometimes make a smaller version of these earrings. Make a vertical mark in the center.


Place the wire on the template. Grab the wire with chain nose pliers at the vertical mark.

Lift the wire and bend it at this point to form an almond shape.

Hammer the leading edge and the bend area with a chasing hammer. This will harden the wire and provide the appropriate springiness.

Repeat all steps with the 2nd piece of wire and trim them to the same length. File the ends as you would with any earwire. You can tumble them now for shine and a bit more hardness. This will also help smooth the ends a little more.


Here is a pair of earrings that I oxidized and completed with vintage glass beads:

Wednesday, April 15, 2009

Tutorial :: A Simple Clasp

I originally wrote and photographed this tutorial for the Artisan Beaders Blog, but I decided to share it here too.

Let's make a simple clasp. Start by cutting 2 pieces of 18 ga wire: one piece is 2" and the other is 1 1/2". Make sure the ends are cut flush. Trim if necessary. I like 18 ga for this style clasp, mostly because of the style of necklace that I use it with. It can certainly be done with 16 ga wire for a heftier piece of jewelry.

Using the larger length of wire and round nose pliers, make a small loop at one end and a slightly larger loop at the other, both on the same side of the wire.


Choose a dowel. I use a size 10 metal knitting needle, but you could use a Sharpie pen or a wooden dowel. A size 13 knitting needle works well too, resulting in a much curvier clasp. Place the wire on the dowel, off -center, being sure to keep the end with the smaller loop as the shorter end.

Hammer the curve with a chasing hammer on an anvil or bench block. This is not a necessary step, but I like the way it dresses up the clasp. At this point, you can also use a plastic mallet to hammer the clasp to work harden it.


Using the shorter piece of wire, make a small loop at one end with round nose pliers.


Remove the wire from the pliers and place it so the loop is above the jaws, at the very widest point, up against the joint. Be sure the loop facing away from you.


With your fingers, bend the tail end of the wire around this wide spot, forming a figure-eight.


Again, remove the wire from the jaws of the pliers and re-place it on the other jaw. This allows you to continue bending the wire to form a true figure-eight. Trim the excess wire with flush cutters. You can hammer the curved points as you did with the other part of the clasp.


I usually make a whole bunch of these in one session and put them in the tumbler for 2 - 3 hours.


That's it -- now go bend some wire!

Thursday, May 22, 2008

Another Earwire Tutorial !

This style of earwire has been a bestseller for me for many years. I offer it almost exclusively as an interchangeable earring, which I sell in sets with 5 different pairs of drops.


Cut a 3" piece of 20 ga half-hard sterling silver wire. At one end, make the smallest, roundest loop you can with round nose pliers.

Using your favorite pair of pliers (I use my bent nose pliers with a coating of Tool Magic), set the loop in the jaws of the pliers, close to the joint. With your thumb, coax the wire up and around the initial loop to start the spiral. Reposition the the spiral and repeat until there are 2 1/2 revolutions.

Flatten this spiral. Here, I've used my rolling mill, but this could be done just as effectively with a chasing hammer and an anvil or bench block.


Place the flattened spiral in the jaws of the pliers and bend the remaining wire back at a 90 degree angle. With the other earring in the pair, you will bend this wire toward you at a 90 degree angle. This will create 2 earrings that are mirror images of each other.

Place your round nose pliers just past the bend and using your fingers, bend the remaining wire straight up. This will create the space where your dangle will go.

To create the part that goes through your ear, I use a size 13 aluminum knitting needle, as shown in the photo. I find it helpful to do both earrings at once, to ensure that they are the same length.

Using a chasing hammer and anvil, flatten the top of this curve. This will work-harden your earwire even more and provide the desired "springiness". File the ends and bend them up slightly.

Thursday, May 8, 2008

Earwire Tutorial

I've been making my own earwires for many years. What follows is a tutorial for a very simple style that is a great way to get started. As time allows, I will add tutorials for several other styles of earwires.

I start with 3" - 3 1/2" of 20 ga half-hard sterling silver wire. If this is your first time trying this, you might want to practice with copper wire before cutting the sterling! Hammer about 1/4" of the end of the wire flat using a chasing hammer and either an anvil or bench block.


Next, using your round nose pliers, make a small loop at the flattened end: Placing the round nose pliers just above this loop, make a bend in the opposite direction, as shown in the next 2 photos. In the 3rd photo below, you can see that I'm making the curve that will go through your ear. Here, I am using a size 13 aluminum knitting needle as a "jig". A Sharpie pen works well too.To finish the earwires, hammer both the top curve and the small curve at the bottom where your drops will go. This hardens the wire and dresses it up at the same time. Don't forget to file the ends and make a small bend in the end, if desired.