
No, I'm not talking about dating in the Far North. I'm talking about using rivets to connect metals. It was one of the primary things I learned during my last class at Volcano Arts (almost a year ago now!)
When I returned from that class, I did a series of blog posts here, here, here and here. And I also created some pieces last summer using the skills I learned and posted them here. Now that my General Earring Inventory is close to where I like it to be (~200 pairs ready for either wholesale or consignment), I decided to tackle some new projects using rivets.
The first few things I made turned out ok, but not awesome. I think I was trying too hard to come up with interesting designs and not planning enough. One of the most important things I learned in that class was to plan your piece from start to finish. Otherwise, you can get yourself stuck in a corner, with no way out. Not good.
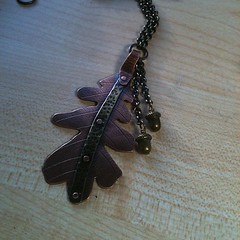
This oak leaf pendant is well executed, but it doesn't excite me. It's too flat ... or something!
My dissatisfaction with this helped me make the decision to go back to a familiar design that DOES excite me. Basically, I'm moving forward with "variations on a theme", an approach that has served me well with almost all of my jewelry making for the past 16 years. With each piece I make, I learn something new and my technique improves. Yes, the pieces are similar, but there's nothing wrong with that. It lets me hone my skills, without the added pressure of coming up with new designs.
I'll be at it for the next few days, making more of these 3 dimensional pendants with copper, brass, pearls, gemstones and who knows what else!
When I returned from that class, I did a series of blog posts here, here, here and here. And I also created some pieces last summer using the skills I learned and posted them here. Now that my General Earring Inventory is close to where I like it to be (~200 pairs ready for either wholesale or consignment), I decided to tackle some new projects using rivets.
The first few things I made turned out ok, but not awesome. I think I was trying too hard to come up with interesting designs and not planning enough. One of the most important things I learned in that class was to plan your piece from start to finish. Otherwise, you can get yourself stuck in a corner, with no way out. Not good.
This oak leaf pendant is well executed, but it doesn't excite me. It's too flat ... or something!
My dissatisfaction with this helped me make the decision to go back to a familiar design that DOES excite me. Basically, I'm moving forward with "variations on a theme", an approach that has served me well with almost all of my jewelry making for the past 16 years. With each piece I make, I learn something new and my technique improves. Yes, the pieces are similar, but there's nothing wrong with that. It lets me hone my skills, without the added pressure of coming up with new designs.
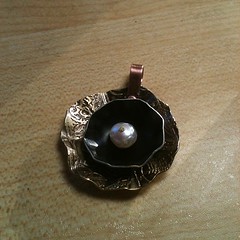
Better, right?
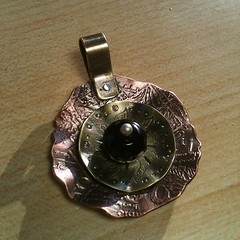
Even better yet!
(well, except for the stupid ding just to the left of the top rivet... grrr)
I'll be at it for the next few days, making more of these 3 dimensional pendants with copper, brass, pearls, gemstones and who knows what else!


