
Cut 2 pieces of wire, each about 3" long. I like to use 20 ga half hard for all of my earwires. Make sure your ends are flush cut.
Let's start with a very basic tip. Use a fine point Sharpie to mark a spot on your round nose pliers. This will guarantee that you make the same size loop every time. Make a mark about halfway up. You may have to experiment with the placement of this mark on your pliers, as each brand will be a little different.
 Place the wire on the Sharpie mark and make a small loop. This is where the "dangle" will be added when you're done. Repeat with second piece of wire.
 Find an item that you can wrap this wire around. I've been using a small glass canister that measures 1 1/8" in diameter. Be creative and look in the kitchen too. Some utensil handles might be just the right size. Gently bend the wire around the cylinder with your fingers. It will spring back slightly, especially if you're using half hard wire, like I do.
 Draw a "template" on a piece of paper in this exact shape. In this next photo, you can see that I have 2 different templates on one piece of cardstock. I sometimes make a smaller version of these earrings. Make a vertical mark in the center.
Place the wire on the template. Grab the wire with chain nose pliers at the vertical mark.
 Lift the wire and bend it at this point to form an almond shape.
 Hammer the leading edge and the bend area with a chasing hammer. This will harden the wire and provide the appropriate springiness.
 Repeat all steps with the 2nd piece of wire and trim them to the same length. File the ends as you would with any earwire. You can tumble them now for shine and a bit more hardness. This will also help smooth the ends a little more.
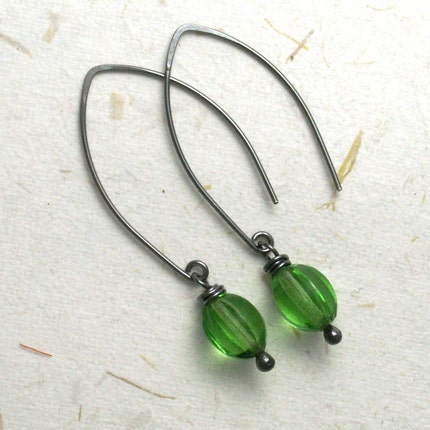
Here is a pair of earrings that I oxidized and completed with vintage glass beads:
5 comments:
You are the queen of the tutorial!
I agree with the goat. You are the Queen of tutorials and I boy at your feet. LOL! Seriously, the tut is fantastic! Thanks for sharing it with all of us wire challenged people.
Nicole/Beadwright
http://beadwright.blogspot.com
Great tutorial. But I still have no holes in my ears....
I really love coming across artisans who are willing to take the time to share! Great tutorial!
Thank you so much I a confident to give it a try now...
Post a Comment