Saturday, May 12, 2012

Fused Glass Tile

A couple of weeks ago, there was a lovely event up in Palmer called "Who Let the Girls Out".  There were activities and special things going on all over town.  While at Half Moon Creek delivering some new earrings, I decided to take advantage of their offer to make a fused glass tile.  The upstairs studio was full of people and cute kids making tiles.

All manner of glass in a rainbow of colors was available to use on our tiles: shards, chips, stringers and small bits (not the right name, but you get the idea).  All we had to do was arrange some glass on the clear tile and they did the fusing for us.  Here's what I made:


I love the way it turned out.  Pretty cute, huh?  I think I'll hang it in the window in my studio.

Tuesday, April 24, 2012

Volcano Arts :: Enamels

I just returned from a short stay/class at Volcano Arts in California.  It was sort of a last minute trip and I wasn't sure what I would work on this time.  I thought I wanted to make a sterling silver ring with something decorative (not sure what) riveted to the top.  Christine convinced me to try my hand at enameling a small copper cut-out to rivet to the ring-to-be.

Well, the ring project never got off the ground!  It quickly turned in to a pendant, which I know I will wear more that the ring anyway.  The copper flower was just too big for a ring, at least for me.  I used heavy gauge sterling silver sheet for the base of the pendant and the 2 pieces of enameled copper are riveted to it with a handmade copper rivet.


I love it!   I had big plans to do something fancier with the bail, but I forgot to anneal the silver before adding the enameled pieces, so I was limited as to how much manipulation the silver would endure.  The best laid plans ...  There's always more to learn when working with metals.

At this point, I was in love with the idea of enamels and proceeded to spend the rest of my class time making more enameled components.  Anyone who loves color, and has a healthy respect for heat and fire would be right there with me.

Lest you think this is just about sprinkling on some enamel powder to get this magic to happen, there are a series of steps that must be completed before the Fun With Color begins.  This series of components all required the following:
  • cut, saw or punch out a shape
  • mark the center
  • dome
  • drill the center hole that you marked earlier
  • clean with fine grit sand paper and pumice

I like the idea of layers of color for use in a piece of finished jewelry.  I had so much fun choosing the color combinations.  Of course, Christine has every possible color, so much time was spent ogling tempting color charts.


Aren't they cute?  I'm anxious to get started incorporating these into some pendants!

Sunday, April 8, 2012

Seed Bead Projects

For a while now, I've been wanting to start working with seed beads again.  I used to do quite a lot of bead weaving, but in recent years, that activity hasn't had much appeal.  Suddenly, the desire came back!

I signed up for a beaded cabochon class at the Alaska Bead Company and made a wonderful brooch.  I have a bunch of these gorgeous labradorite cabochons and selected one to work with in class.  I'm very pleased with the way it turned out.


Even though I somehow got the pin back finding on crooked, it won't matter once it's pinned on.


Another seed bead project involves a bracelet pattern a bought at one of the Tucson bead shows from June Wiseman of Tapestry Beads.  The bracelet is called Ebb and Flow and it's the perfect name for it!  The pattern was extremely well written and very easy to follow.  The resulting bracelet is fabulous, if I must say so myself!  Even the toggle clasp was easy, which surprised me.


I chose some metallic and metallic looking beads for this bracelet.  I think it will go with just about anything I wear.


I liked the pattern so much that I immediately made another one in blues.


What seed bead projects should I tackle next?

Thursday, March 22, 2012

New Wedding Jewelry

I purchased a few strands of these fun teardrop shaped pearls during my last trip to Tucson.  The shapes were just different enough to give them an organic feel, but similar enough to evoke a feeling of cohesiveness.  I created simple pearl solitaire necklaces that would be perfect for a bridal party.  The quantity listed is 5, but it is simple to alter the quantity in either direction -- whatever the bride needs for her bridal party!


Click on the photo to go directly to the listing in my etsy shop. Feel free to share this with any brides-to-be you may know  :)

Thursday, March 15, 2012

Before and After

Jet was getting very raggedy and in dire need of a grooming.  We didn't get it done through the winter because of the brutally cold temperatures.  We go for long walkies everyday and we were concerned that he would get too cold without a full coat.

Now that the temperatures have become more moderate, we decided it was time to get Jet Man cleaned up. Well, his fur was so matted on his belly that the grooming was dramatic.  It had to be.

Here he is before, with his daddy :)


And now, he doesn't even look like himself!  We weighed him before and after -- he lost 3 pounds of fur!! He's a mere shadow of his former self. The good news is that fur does indeed grow back.  Can't wait for him to look like a Giant Schnauzer again -- right now he looks like a cross between a Great Dane and a Doberman.


For those of you wondering just how much snow we have received this winter, here's a look at our partially shoveled roof.  Rick did this last week as a precautionary measure.


And all of that snow had to go somewhere.  It is now partially blocking the window in the studio area of our house.


Here's a look down my driveway.  Whenever I drive in, I feel like I'm entering a bobsled or luge track!


Wednesday, March 7, 2012

Cold Connections

No, I'm not talking about dating in the Far North.  I'm talking about using rivets to connect metals.  It was one of the primary things I learned during my last class at Volcano Arts (almost a year ago now!)

When I returned from that class, I did a series of blog posts here, here, here and here.  And I also created some pieces last summer using the skills I learned and posted them here.  Now that my General Earring Inventory is close to where I like it to be (~200 pairs ready for either wholesale or consignment), I decided to tackle some new projects using rivets. 

The first few things I made turned out ok, but not awesome.  I think I was trying too hard to come up with interesting designs and not planning enough.  One of the most important things I learned in that class was to plan your piece from start to finish.  Otherwise, you can get yourself stuck in a corner, with no way out.  Not good.

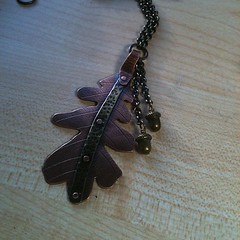
This oak leaf pendant is well executed, but it doesn't excite me.  It's too flat ... or something! 


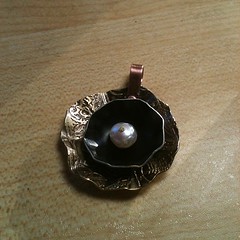
My dissatisfaction with this helped me make the decision to go back to a familiar design that DOES excite me.  Basically, I'm moving forward with "variations on a theme", an approach that has served me well with almost all of my jewelry making for the past 16 years.  With each piece I make, I learn something new and my technique improves.  Yes, the pieces are similar, but there's nothing wrong with that.  It lets me hone my skills, without the added pressure of coming up with new designs.

Better, right?


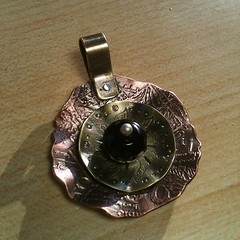
Even better yet!
(well, except for the stupid ding just to the left of the top rivet... grrr)


I'll be at it for the next few days, making more of these 3 dimensional pendants with copper, brass, pearls, gemstones and who knows what else!